Control your PC with the 50g
Abstract
This article will demonstrate how to use your 50g to control your Windows/XP keyboard and mouse. Examples include:
This automation is achieved with SerialKeys. SerialKeys is a serial
port keyboard and mouse interface primarily used as an accessibility feature.
Although this article targets the 50g and Windows/XP, it should be trivial to
repurpose for any 48/49 and for OS/X and Linux.
Hardware
Windows/XP SerialKeys will only listen to COM ports 1 through 4 at speeds up to 19200 baud. Although the 50g has USB and Serial connectivity I choose to use the Serial port (it was easier).
Hardware Inventory:
Hook it all up (there is only one way to connect all the parts).
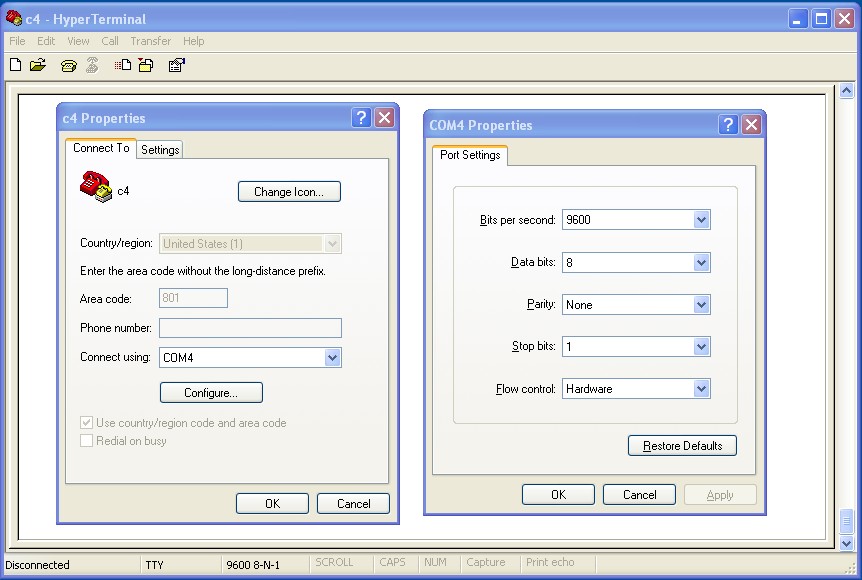
After you have it all connected, use HyperTerminal to confirm that you can communicate. E.g. my USB Serial Adapter is configured as COM4: so I have HT configured like this:
To test, type from the 50g (you may want to backup IOPAR from your { HOME } directory first):
-33 CF
-78 SF
9600 BAUD
0 PARITY
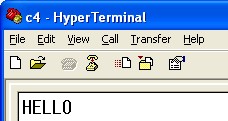
"HELLO" XMIT
If working your Hyper Terminal session should look like this:
If you do not see anything, verify that you clicked the connect button
(3rd from the left) and that everything is connected. When done testing
exit Hyper Terminal to free up your COM port.
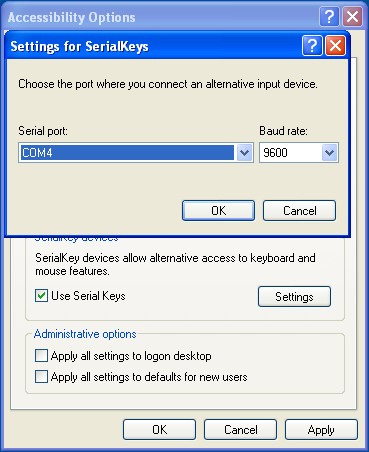
SerialKeys Configuration
Enabling SerialKeys is very simple:
NOTE: As you disconnect and reconnect your USB Serial Adapter you may need to uncheck/Apply, and recheck/Apply "Use Serial Keys".
NOTE: SerialKeys can coexist with your standard keyboard and mouse.
No need to choose.
Sending text to your PC
All of the example programs can be obtained from http://sense.net/~egan/skb/IOKB.hp. Just drop that object in to the root of your 50g. All of the examples will be in the IOKB directory.
%%HP: T(3)A(R)F(.);
\<< DUP \-> s                 @ Copy first stack item and save to 's'
  \<<
    -33 CF                    @ Wire Transfers
    -78 SF                    @ Use Serial Port (not USB)
    PATH                      @ Put current PATH on stack
    IOPAR                     @ Put current IOPAR on stack
    9600 BAUD                 @ Set 9600 BAUD Rate
    0 PARITY                  @ Set 0 Parity
    s \->STR                  @ Convert to string
    XMIT                      @ Send out serial port
    DROP                      @ Ignore XMIT return code (bad practice)
    { HOME } EVAL             @ Stack should have 1:IOPARs, 2:PATH, cd to ( HOME )
    'IOPAR' STO               @ STO IOPARs as IOPAR
    EVAL                      @ PATH left on stack, EVAL to CD back
    -78 CF                    @ Use USB
  \>>
\>>
The above program (SKB) will backup IOPAR, setup and enable the serial port, transmit a string version of the first stack item (while leaving the stack unchanged), then will restore IOPAR and enable USB. If you do not mind your flag or IOPAR settings changed, then only the following list of commands is required:
Setup (one time):
-33 CF -78 SF 9600 BAUD 0 PARITY
Send (as many times as you like):
->STR XMIT
To test SKB, open up Excel, put 123.45 on the stack and run SKB.
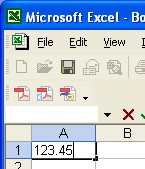
Ta da! You will notice that the cursor is still in the same cell. To actually skip from cell to cell we need to send special sequences. Excel uses "Enter" to jump down and "Tab" to jump next. With a few changes to SKB we can add this functionally.
In the IOKB directory there are two other programs; SKBE and SKBI, they function the same as SKB except terminate with an Enter or a Tab.
SKBE differences:
s \->STR 27 CHR + "enter." +
SKBI differences:
s \->STR 27 CHR + "tab." +
IANS, an ESC and the string "tab." or "enter." is appended to our input. See [1] and [2] for more details.
To demonstrate SKBE and SKBI open a new Excel workbook and run the TT program. The output should look like this:
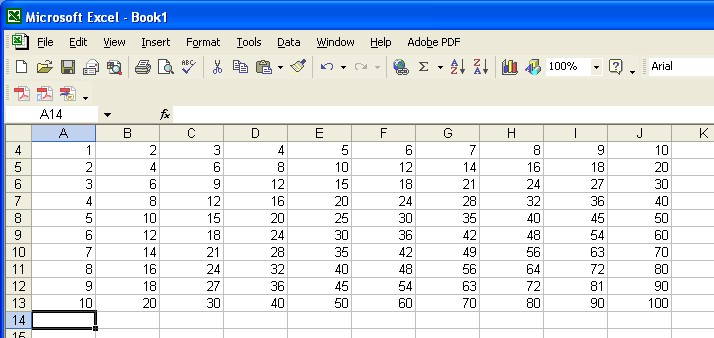
The TT program generates a 10x10 times table using SKBE and SKBT to move from cell to cell.
%%HP: T(3)A(R)F(.);
\<<
  1 10 FOR i
    1 10 FOR j
      i j *
      j 10 == IF
      THEN
        SKBE            @ If at end of row press Enter
      ELSE
        SKBT            @ Not a end of row, Tab over
      END
      DROP
    NEXT
  NEXT
\>>
The SKB* commands have a lot of
setup and teardown, the above example is probably not the most efficient way to
do something like this. The following examples below perform one setup and
teardown with multiple SerialKey actions inbetween.
Use your PC as a 50g Plotter
The PPLOT program will plot a list of points and and connect them. To generate some examples use the GENPLOY program (see Appendix A for source). GENPOLY takes two arguments (radius and number of sides) and returns the points of a regular polygon. The first point is returned twice, once at the start and one at the end of the list to close the polygon.
The following commands
100 3 GENPLOY PPLOT
100 4 GENPLOY PPLOT
100 5 GENPLOY PPLOT
100 6 GENPLOY PPLOT
produced the following output in Paint Brush:
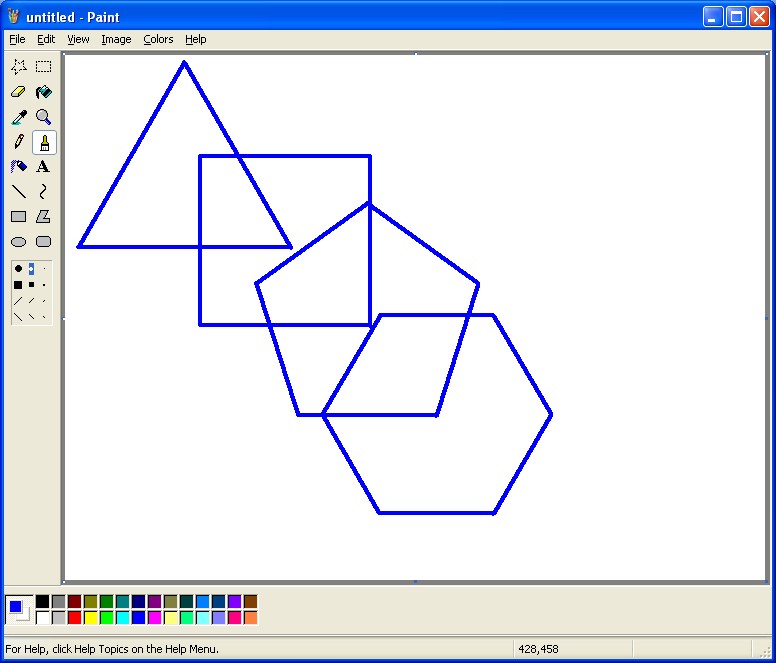
A bit of help was required. I did have to select the brush type, the color, and position the pointer away from the boarders. It is possible to perform absolute addressing of the pointer, but I choose not to in this example.
Below is the PPLOT code with comments:
%%HP: T(3)A(R)F(.);
\<< 0 0 \-> p x y                                 @ Store list of points in p, zero x and y
  \<<
    -33 CF -78 SF PATH IOPAR 9600 BAUD 0 PARITY   @ Standard setup
    1 p SIZE FOR i                                @ Main loop processes each point
      p i GET                                     @ Get next point from list
      0 RND R\->I                                 @ Round and convert to integer type (i.e. pixels)
      DUP                                         @ Save this point to be the "last point" to
                                                  @   calculate movement
      i 1 \=/ IF
      THEN
        OBJ\-> DROP y - NEG SWAP x -              @ If not first point, calc movement from last
      ELSE
        OBJ\-> DROP NEG SWAP                      @ First point, just move there to start draw
      END
      DUP
      0 \>= IF                                    @ The following lines create a move to string
      THEN                                        @ consisting of a horizontal, vertical pair,
        "+"                                       @ each direction is prefixed with a + or -,
      ELSE                                        @ e.g. "+10,-10" = go ten right and ten up
        ""
      END
      SWAP + "," + SWAP
      DUP
      0 \>= IF
      THEN
        "+" SWAP +
      END
      + 27 CHR ",move," + SWAP + "." +            @ prepend "ESC,move," and append "."
      XMIT DROP                                   @ XMIT it, ignore return code
      i 1 == IF                                   @ After moving to the first point, hold down
      THEN                                        @ the left mouse button.  Future movements will
        27 CHR ",moulock,left." +                 @ draw.
        XMIT DROP
      END
      OBJ\-> DROP 'y' STO 'x' STO                 @ Remember that DUP at the start?  Use it for last
    NEXT                                          @   point
    27 CHR ",mourel." +                           @ All done, take finger off mouse button
    XMIT DROP
    { HOME } EVAL 'IOPAR' STO EVAL -78 CF         @ Back to USB mode
  \>>
\>>
Unfortunately there is no way to tell where your pointer is. However
there is a way to send to 0,0, then track your movements after that. For
more info see [1].
Interactive Mouse Control
The MOUSE program can move and click the mouse. Use the arrows to move the mouse. The + and - keys will double or half the number of pixels/movement. Use left and right shift for the left and right mouse buttons (click only, no drag and drop, that is an exercise for the reader). If you need a left double click use Enter.
%%HP: T(3)A(R)F(.);
\<< 0 20 0 \-> k s v          @ Init vars, s = pixes/move
  \<<
    -33 CF                    @ Wire Transfers
    -78 SF                    @ Use Serial Port (not USB)
    PATH                      @ Put current PATH on stack
    IOPAR                     @ Put current IOPAR on stack
    9600 BAUD                 @ Set 9600 BAUD Rate
    0 PARITY                  @ Set 0 Parity
    DO                        @ Main loop.  Get one key and process it.
      IFERR                   @ If ON/Cancel is pressed process below.
        DO                    @ Loop until a key is pressed (and released).
          KEY
        UNTIL END
      THEN                    @ KEY cannot get ON/Cancel, this code will catch it.
        IFERR                 @ KEY after cancel may or may not have put 0 on stack.
          DUP                 @ Setup IFERR again to error on DUP.
          0 == IF             @ IF DUP ok, check for 0 and DROP.
          THEN
            DROP
          END
        THEN
        END
        101                   @ Put 101 on stack if ON/Cancel
      END                     @ Bottom line, put KEY code on stack or 101 if ON/Cancel
     'k' STO                  @ Store k for key checks
      0 'v' STO               @ init v = 0
      k 25 == IF              @ Up pressed, build move string, set v = 1
      THEN
        27 CHR ",move,+0,-" + s + "." +
        1 'v' STO
      END
      k 35 == IF              @ Left pressed, build move string, set v = 1
      THEN
        27 CHR ",move,+0,+" + s + "." +
        1 'v' STO
      END
      k 34 == IF              @ Down pressed, build move string, set v = 1
      THEN
        27 CHR ",move,-" + s + ",+0." +
        1 'v' STO
      END
      k 36 == IF              @ Right pressed, build move string, set v = 1
      THEN
        27 CHR ",move,+" + s + ",+0." +
        1 'v' STO
      END
      k 105 == IF             @ Enter pressed, build click string, set v = 1
      THEN                    @   Enter is left double-click
        27 CHR ",dblclick,left." +
        1 'v' STO
      END
      k 81 == IF              @ Left-shift pressed, build click string, set v = 1
      THEN                    @   Left-shift is left mouse button
        27 CHR ",click,left." +
        1 'v' STO
      END
      k 91 == IF              @ Right-shift pressed, build click string, set v = 1
      THEN                    @   Right-shift is right mouse button
        27 CHR ",click,right." +
        1 'v' STO
      END
      k 95 == IF              @ + pressed, double s, i.e. pixel skip
      THEN
        s 2 * 's' STO
      END
      k 85 == IF              @ - pressed, half s, but always > 0
      THEN
        s 2 / CEIL 's' STO
      END
      v 1 == IF               @ if v = 1 send string
      THEN
        XMIT DROP             @ XMIT and ignore return code (bad)
      END
    k 101 == UNTIL            @ if k = 101 (ON/Cancel) exit loop and cleanup
    { HOME } EVAL             @ Stack should have 1:IOPARs, 2:PATH, cd to ( HOME )
    'IOPAR' STO               @ STO IOPARs as IOPAR
    EVAL                      @ PATH left on stack, EVAL to cd back.
    -78 CF                    @ Use USB.
    "DONE" DOERR              @ Done message in pretty box with beep.
  \>>
\>>
Fairly useless, use a real mouse! For more information see [2].
Controlling EMU48
The previous program while useless does provide a framework for capturing any 50g keystroke (even ON), with the exception of multiple key sequences, e.g. ON+C.The GREM program is a generic remote control program. Instead of using countless tedious IFs, a list (SKBL) is used to define all 105 keys. The SKBL included in the IOKB directory is perfectly suited for controlling EMU48 emulating a 50g.
%%HP: T(3)A(R)F(.);
\<< 0 \-> onc                 @ ON Button Counter = 0
  \<<
    -33 CF                    @ Wire Transfers
    -78 SF                    @ Use Serial Port (not USB)
    PATH                      @ Put current PATH on stack
    IOPAR                     @ Put current IOPAR on stack
    9600 BAUD                 @ Set 9600 BAUD Rate
    0 PARITY                  @ Set 0 Parity
    DO                        @ Main loop.  Get one key and process it.
      IFERR                   @ If ON/Cancel is pressed process below.
        DO                    @ Loop until a key is pressed (and released).
          KEY
        UNTIL END
      THEN                    @ KEY cannot get ON/Cancel, this code will catch it.
        IFERR                 @ KEY after cancel may or may not have put 0 on stack.
          DUP                 @ Setup IFERR again to error on DUP.
          0 == IF             @ IF DUP ok, check for 0 and DROP.
          THEN
            DROP
          END
        THEN
        END
        101.                  @ Put 101. on stack if ON/Cancel
        'onc' INCR DROP       @ If you got here, ON was pressed, increment 'onc'
      END                     @ Bottom line, put KEY code on stack or 101 if ON/Cancel
      DUP                     @ Copy KEY code for ON/Cancel check.
      SKBL SWAP GET           @ Get SerialKeys string from SKBL List and return to stack
      XMIT DROP               @ Transmit it, dump return code (we should probably check for error)
      101 \=/ IF              @ If no ON/Cancel, reset onc to 0
      THEN
        0 'onc' STO
      END
    onc 3 == UNTIL END        @ If onc == 3, i.e. three ON/Cancel in a row, then exit.
    { HOME } EVAL             @ Stack should have 1:IOPARs, 2:PATH, cd to ( HOME )
    'IOPAR' STO               @ STO IOPARs as IOPAR
    EVAL                      @ PATH left on stack, EVAL to cd back.
    -78 CF                    @ Use USB.
    "DONE" DOERR              @ Done message in pretty box.
  \>>
\>>
The only tricky part is knowing what to do with ON/Cancel. The code above checks for 3 ONs in a row to exit. To avoid any unpleasantness press the 3 ONs about 0.5 seconds apart. This will avoid killing the program mid way.
The SKBL table is fairly strait forward. The 50g keys are assigned with a range of 1 to 105. Clearly there are less than 105 keys, so zeros are used as placeholders.
%%HP: T(3)A(R)F(.);
{
0 0 0 0 0 0 0 0 0 0
"a" "b" "c" "d" "e" "f" 0 0 0 0
"g" "h" "i" 0 "\027up." 0 0 0 0 0
"j" "k" "l" "\027left." "\027down." "\027right." 0 0 0 0
"m" "n" "o" "p" "\027bksp." 0 0 0 0 0
"q" "r" "s" "t" "u" 0 0 0 0 0
"v" "w" "x" "y" "z" 0 0 0 0 0
"\027tab." "7" "8" "9" "\027kpstar." 0 0 0 0 0
"\027lshift." "4" "5" "6" "-" 0 0 0 0 0
"\027lctrl." "1" "2" "3" "\027kpplus." 0 0 0 0 0
"\027esc." "0" "." " " "\027enter."
}
So what about multiple key sequences? Well, it is easy with SerialKeys, but not with UserRPL. A SysRPL or ASM program may be required to capture that.
Summary
That was easy!
Author
References
[1]
http://support.microsoft.com/kb/260517
[2]
http://support.microsoft.com/kb/260727/EN-US/
Appendix A
GENPOLY source:
%%HP: T(3)A(R)F(.);
\<< 0 \-> r n o                    @ get radius and number of size from stack, init o with 0
  \<<
    1 n FOR i
      2 \pi * n / i * \pi n / -    @ calculate angle and coordinates
      DUP
      SIN r * \->NUM
      SWAP
      COS r * \->NUM NEG
      2 \->LIST                    @ create point as 2 element list
      1 i == IF
      THEN
        DUP 'o' STO                @ if first point, DUP and save as 'o' for later use
      END
    NEXT
    o n 1 + \->LIST                @ create list of points with first point (o) appended
  \>>
\>>