xCAT SuSE Management Node HOWTO
The purpose of this document is to describe HOWTO build a SuSE-based xCAT management node. This document assumes:
- IA64 or IA32 node
- (1) 18Gb drive for /boot
- (2) 73Gb drives software mirrored for root and swap
- SuSE SLES8 (however other versions >=8 should not differ too much)
This document assumes familiarity with xCAT 1.1.8 and the Building a Linux HPC Cluster with xCAT Redbook. The Redbook covers Red Hat-based management nodes.
This document was prepared using SLES8 IA64, the following notes apply to SLES8 IA32 and SuSE8.1 IA32:
- /boot should not be FAT.
- Do not install the boot loader in /dev/sda1, use the MBR.
- Software mirroring is an option for IA64 and IA32. It is documented here because of the lack of hardware RAID controllers supported by SLES8 IA64. SLES8 IA32 supports a large array of RAID controllers including IBM's ServeRAID. Hardware RAID should be used whenever possible.
Notes:
- Insert SuSE SLES8 CD 1
- Reboot -- wait for menu shown here.
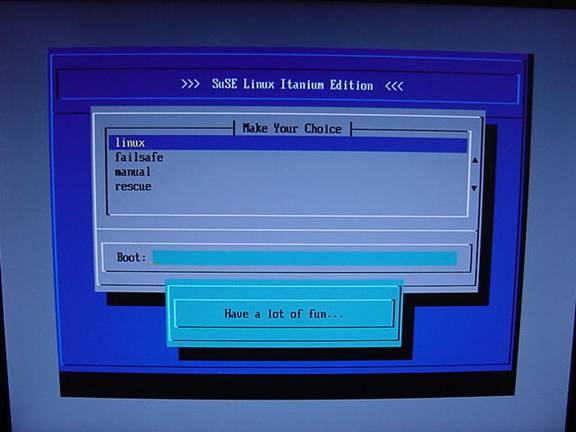
- Select linux from menu
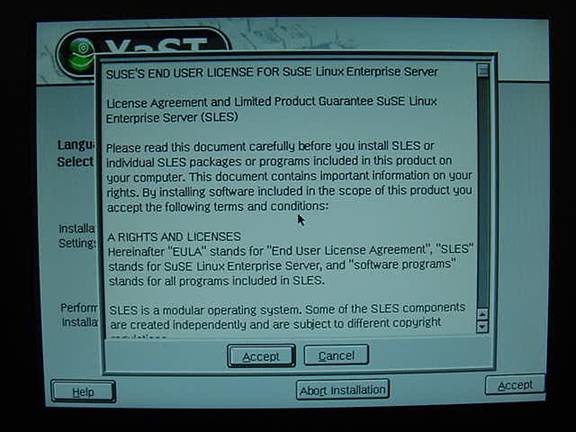
- Press enter to accept license terms
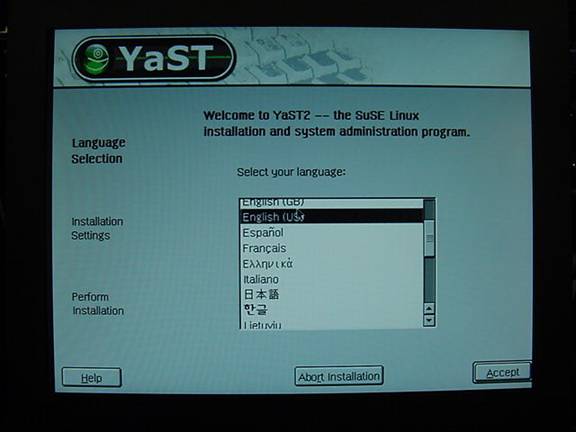
- Select language – select Accept
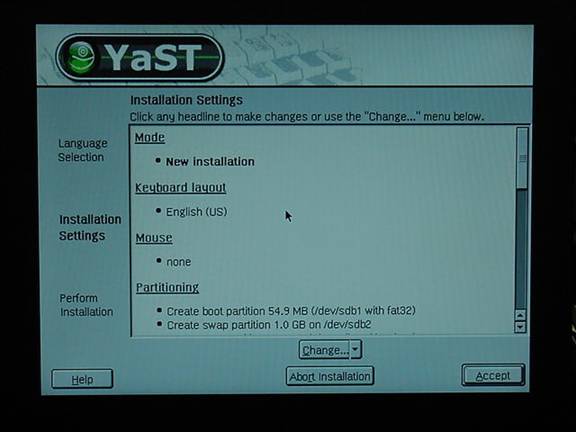
- Wait while the install program analyzes your system.
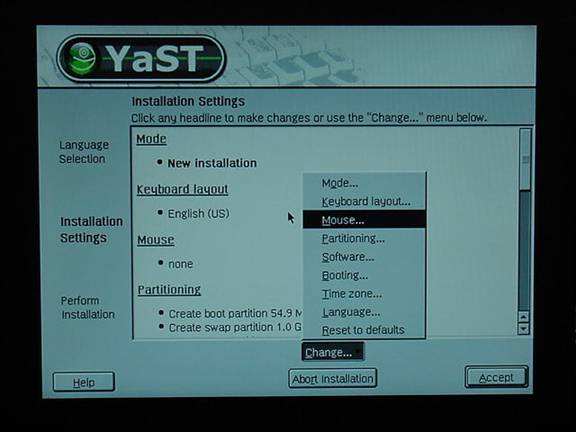
- You should next see the summary of your installation settings
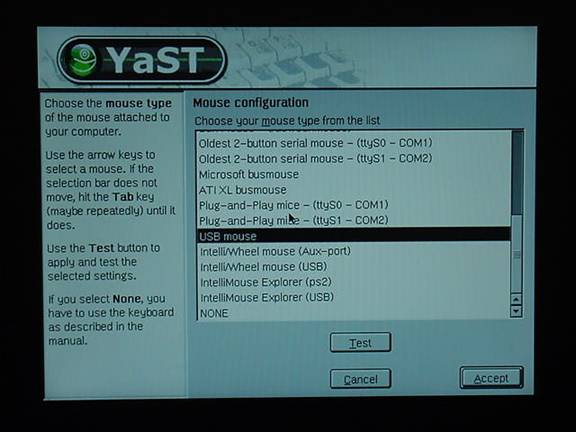
- You need to add a mouse .. Enter <ALT> C . use arrows to select mouse and hit “Enter” See picture 5.
- Use arrows to locate USB Mouse on the mouse list and press Enter to accept.
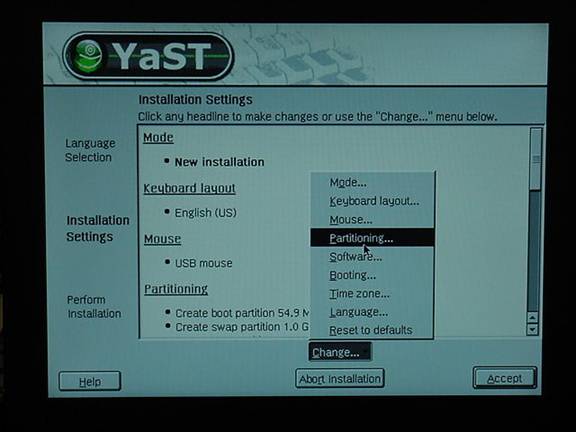
- Click on “Change” and select Partitioning
- select “Create Custom Partition” See Picture 6
- Choose “Create custom partition setup” See picture 7
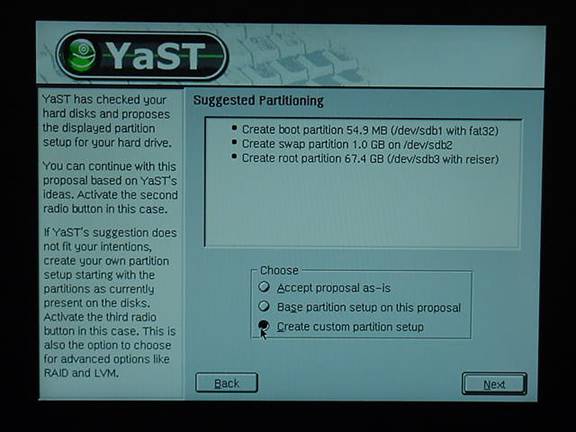
- press next
- Select “Custom partitioning – for experts” from the Step 1 screen.
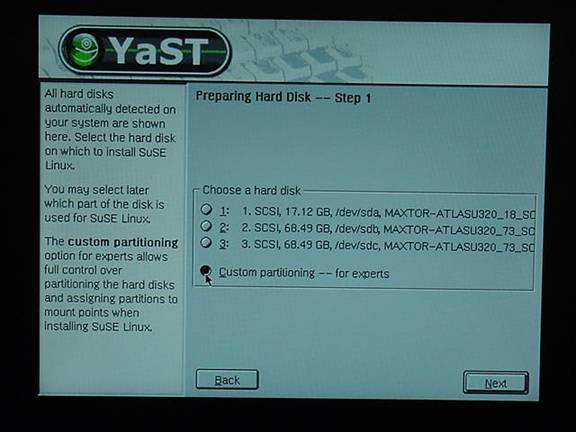
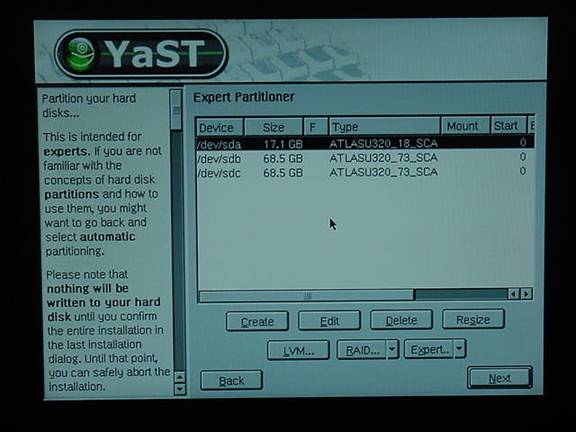
This will present you with the following screen which shows the disk devices currently configured on the system. The tools available from this screen will be used to build the partitions and RAID sets necessary to build a cluster management node.
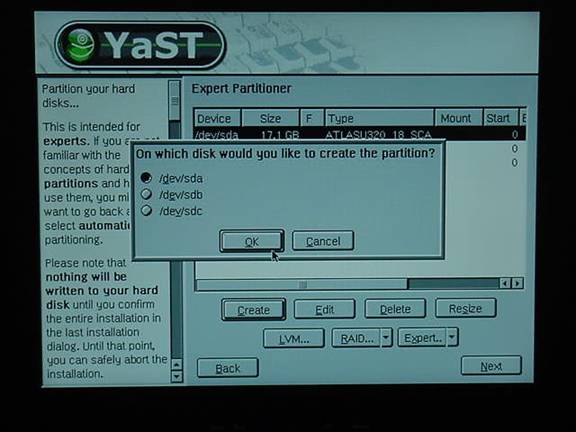
- Create a boot partition on /dev/sda which is an 18GB drive.
- Select a FAT filesystem – under Options select 32 bit for FAT size for this partition.

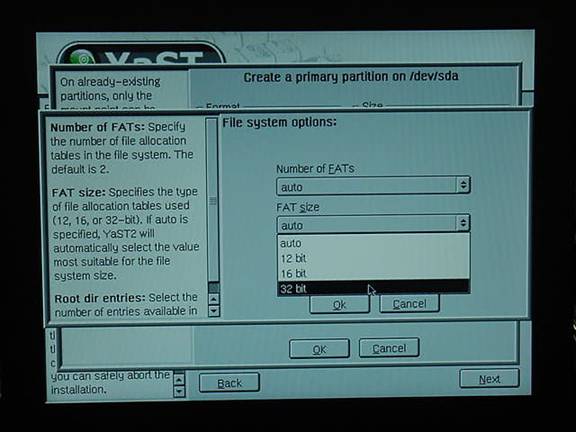
- change mount point to /boot

- A RAID 1 Mirror set will be created on the remaining two disks using the next instruction steps.
- Create two partitions on /dev/sdb, one 8 GB partition for swap and one that is the rest of the disk. See picture -- you must select Linux RAID and request “Do Not Format” to construct a RAID device. The first partition that is created on /dev/sdb (the partition will be called /dev/sdb1) is 8GB. This will be joined in a RAID 1 Mirror set with /dev/sdc1 (also 8GB) to form a mirrored swap device.
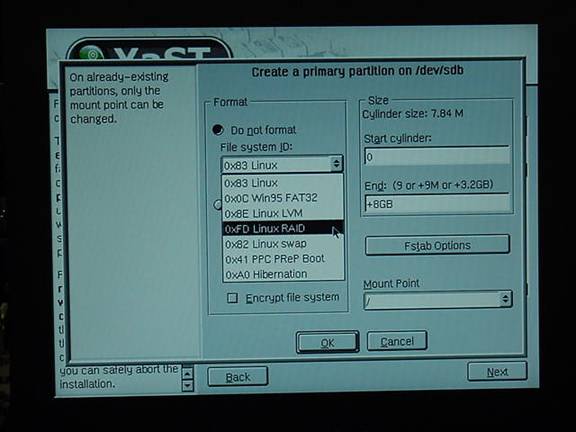
The second partition created on /dev/sdb (this partition will be called /dev/sdb2) uses the remaining space on the disk device. Remember to select “Do not format” and to select a File system ID of “0xFD Linux RAID” just like for /dev/sdb1 above.
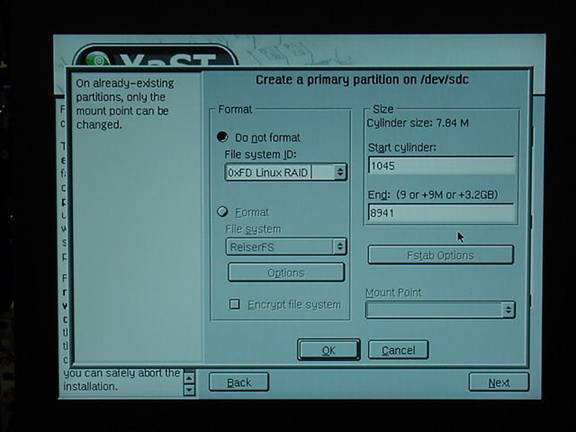
Repeat step 19 instructions to create 2 identical partitions on /dev/sdc which will be called /dev/sdc1 (8GB with type of 0xFD Linux RAID) and /dev/sdc2 (remainder of the disk). You should see the following summary screen after these partitions are successfully created on both disks.
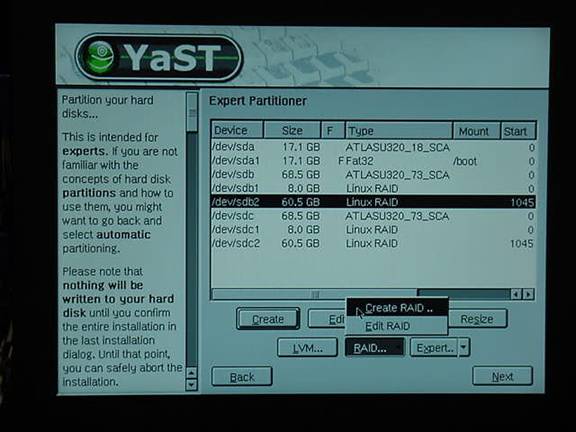
- After partitions are created, select “Create RAID” from RAID menu .
- Select RAID 1 for a mirrored set.
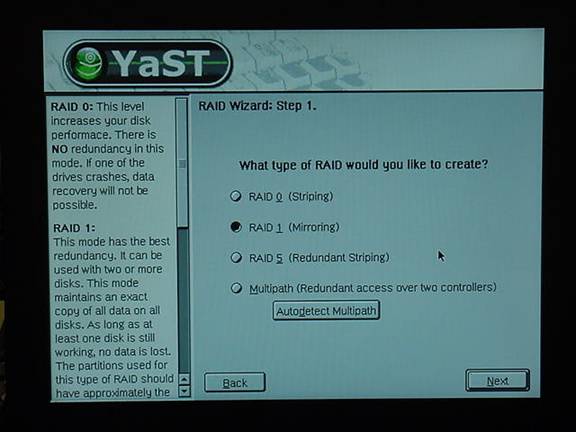
- Select /dev/sdb2 and /dev/sdc2 for addition to the RAID set.
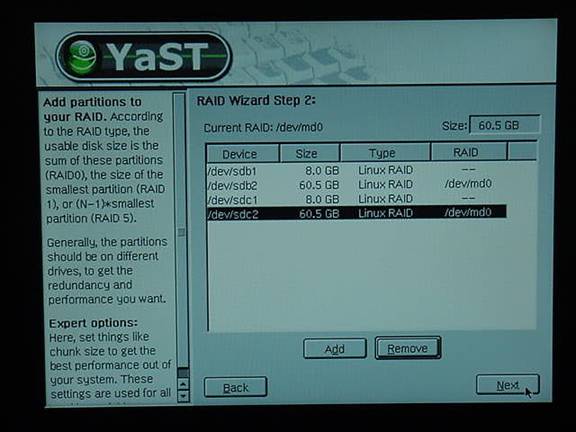
- Set mount point to “/”
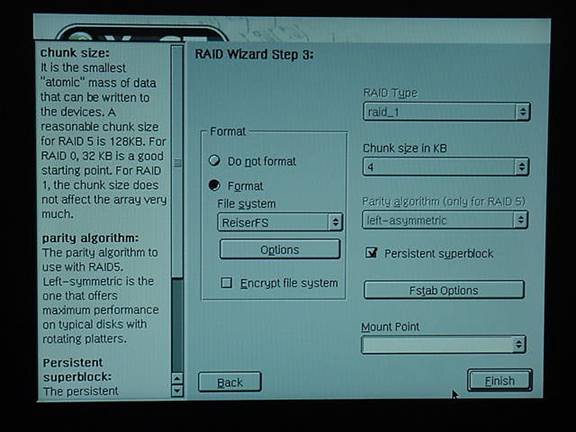
Note that this time we select “Format” and the ReiserFS filesystem type. We want the whole RAID formatted instead of the individual disks that make up the RAID. Therefore, formatting is postponed until the RAID device is created.
- Leave defaults on Raid Wizard Step 3 and select FINISH
- Repeat steps 21 through 24 for /dev/sdb1 and /dev/sdc1 to create a second RAID 1 Mirror set for swap. Under Format Options screen, set filesystem type to swap.

- View summary screen (see picture) select NEXT.
- Select “Software” from “Change” menu.
- Select “Default System”
- Select “Detailed Selection”
- Add C/C++ Compiler
- Change “Selections” to “Package Groups”
- Scroll down to zzzAll and select
- In right hand list, scroll down to Expect and select it
- Then press “Accept”
- Select “Booting….” From “Change” menu
- Select “Write ELILO to a different partition” and specify /dev/sda1
- press Accept
- Select Accept again
- Select “Yes, Install”
At this point, the disk partitions will actually be built and the filesystems specified above will be formatted. Status screens will be displayed while these operations are in progress.
- Insert “United Linux Version 1.0” CD 1 when prompted to do so.
After inserting the CD and pressing OK, the following status screen will detail the progress of the installation.
- Insert “United Linux Version 1.0” CD 2 when prompted to do so.
The status screen will re-appear while the remainder of the software packages are installed.
- Insert “SuSE SLES Version 8” CD 1 when prompted to do so.
The following screen will detail the progress of the last stages of the installation.
- When the notification of a successful install appears, remove the installation media and press OK
The next screen will be the EFI screen showing your boot options. Note that SLES is now available and selected as the default boot option.
- The system will begin to reboot. It will stop during this process for the rest of the pre-boot configuration process. (Note that at this point you no longer have a mouse) The first screen you will see will ask you to create a root password. Enter the password in both text entry windows.
- Use <ALT>-N to move to the next step.
- Create a user “ibm” password “foobar” and enter <ALT>-N to move to the Next screen
- Select Graphical Login, Enter <ALT>-A to accept
At this stage of the installation, the SuSE configuration will be written.
- Skip printer detection <ALT>-S
- The next step is to configure the network adapters. You will be presented with the system installation summary screen.
- Select “Network interfaces….”
- Select the Network interfaces one at a time for configuration.
- Select the device and press Edit.
- Choose static address setup and assign the appropriate IP address to the adapter based on the site addressing scheme.
The above parameters were used for eth0 on this cluster.
And these are the parameters for eth1.
And for eth2.
- Select Next to get to the summary configuration screen.
- Verify that it is correct and presss “Next” or <ALT>-N.
The installation program will then save your network configuration in the Linux configuration files and boot up scripts.
- The system will continue booting as soon as this stage is completed.
- When booting is completed, you will be presented with the login screen.
- The next thing that has to be done is to fix the mouse driver installation procedure to use the driver for the IBM trackpoint pointing device. This is accomplished by using the key sequence <CTRL><ALT>F1 to switch to the (text mode) first virtual terminal. At this point you need to press the key sequence <SHIFT> <NumLock> to disable the NumLock key. Now you can log in as root on the text screen and edit two files per the following directions.
- The first file to edit is /etc/rc.d/boot.local. You need to add the line “modprobe mousedev” to the end of the file.
- The next file to edit is /etc/sysconfig/keyboard. Locate the line beginning with “KBD_NUMLOCK” and change the argument from “bios” to “no” as directed in the comments. This will disable the NUMLOCK key. Save this file and exit.
- Now you need to reboot your system with “/sbin/shutdown –r now”.
- When the system restarts you will be presented with the login screen below.
- Login as root
- And you should arrive at the root user desktop.
- Open a terminal window and enter the command “sax2”. This will present you with the following screen.
- Open “Desktop” and select “Geometry”.
- Use the right arrows to select 70Hz refresh.
- Test your configuration as directed in the notification window.
- The last step is to press the “Auto” button below the screen on your monitor. This will cause the monitor to resize the screen and match the new X Server settings.