| xCAT HOWTO | |
| This document was most recently modified: 09/27/2002 The most recent version of this document is available at: http://xcat.org/docs/xcat-HOWTO.html printable version without xcat.org header and footer |
Author: Matt Bohnsack bohnsack@bohnsack.com http://bohnsack.com/ and others |
Make certain you're using the most recent version of this document, before beginning a cluster implementation or even before you begin reading. Be aware that software versions referenced in this document may be out of date. Always check for newer software versions and be aware of the stability of these newer versions. Send additions and corrections to the author, so this document can continue to be improved. | |
| 1. Introduction |
| xCAT is a collection of mostly script based tools to build,
configure, administer, and maintain Linux clusters. xCAT is for use by IBM and IBM Linux cluster customers only. xCAT is copyright © 2000, 2001, 2002 IBM corporation. All rights reserved. Use and modify all you like, but do not redistribute. No warranty is expressed or implied. IBM assumes no liability or responsibility. This document describes how to implement Linux cluster on IBM xSeries hardware using xCAT and other third party software. It covers the latest version of xCAT - v1.1RC9.9.5 with RedHat 6.2, 7.0. 7.1, 7.2, or 7.3 as an OS base. All of the examples cover installation on ia32 machines. xCAT does work with ia64 machines, but specific ia64 configuration is not detailed. Specific configuration examples from a somewhat common 32 node PIII cluster configuration are included. You will need to adjust the configuration examples shown in this document to suit your particular cluster and architecture, but the examples should give a good general idea of what needs to be done. Please don't use this document verbatim as an implementation guide. You should rather use it as an inspiration to your own implementation. Use the man pages, source and other documentation that is available to figure out why certain design/configuration choices are made and how you can make different choices. This document covers only a very little of the hardware connectivity, cabling, etc. that is required to implement a cluster. Additional documentation including hardware installation and configuration is available as a RedBook at http://publib-b.boulder.ibm.com/Redbooks.nsf/9445fa5b416f6e32852569ae006bb65f/7b1ce6b3913cafb386256bdb007595e8?OpenDocument&Highlight=0,SG24-6623-00. If you're serious about implementing a cluster and learning how things work, you should read the RedBook in addition to this document. |
Back to TOC
| 2. Understanding What xCAT Does - Feature/Functionality Hierarchy | ||||||||||||||||||||||||||||||||||||||||||||||||||||||||||||||||||||||||||||||||||||||||||||||
This section explains what you can do with xCAT, why xCAT is
designed the way it is, and presents a feature/functionality
hierarchy.
|
Back to TOC
| 3. Getting the xCAT Software Distribution |
| This section explains where and how you can get the xCAT
software distribution. Use the form available at http://xcat.org/download/ to request a username/password, if you don't already have one. Make certain that you fill out all the fields and provide a valid IBM sales contact. If you don't provide a valid IBM sales contact, your request may be ignored. |
Back to TOC
| 4. Getting Other Required Software | ||
This section will list of all the CDs, floppies, and
software you might need to install a cluster and where to get them
(but it's not complete yet).
|
Back to TOC
| 5. Reading Related Documentation |
| There's quite a bit of related documentation available in various stages of completion. You should read it. It's all accessible at http://xcat.org/docs/. |
Back to TOC
| 6. Getting Help |
| If you need assistance with building, maintaining, or administering your xCAT cluster, or you have an xCAT feature request, try the xCAT-user mailing list or contact your IBM sales rep or other IBM point of contact. |
Back to TOC
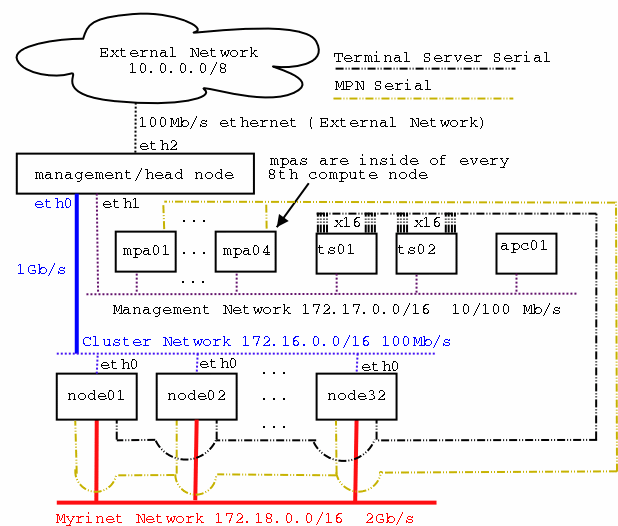
| 7. Understanding Cluster Components and the Example Cluster's Architecture | |||||||||||||||||||||||||||||||||||||||||||||||||||||||||||||||||||||||||||||||||||||||||||||||||||||||||
This document uses a 32 node cluster that uses serial terminal
servers for out-of-band console access, an APC Master Switch and
IBM's Service Processor Network for remote hardware management,
ethernet, and Myrinet as the
basis of most of its examples. The following three diagrams describe
some of the detail of this example cluster:
| |||||||||||||||||||||||||||||||||||||||||||||||||||||||||||||||||||||||||||||||||||||||||||||||||||||||||

Back to TOC
| 8. Installing the OS on the Management Node | ||||||||||||||||||||||||
The first step in building an xCAT cluster is
installing Linux on the management node. This is, roughly, how to do
just that:
Pass ide=nodma to the installer, (i.e., install: text ide=nodma) and then after the install is complete, add append="ide=nodma" to /etc/lilo.conf, /sbin/lilo, and reboot to a system with IDE DMA diabled. If you're using grub, you'll have to add the ide=nodma line to the end to the kernel stanza you want to boot. I highly recommend that you do the above... I've seen this problem as recently as 2002-06-06.
To view installed services: > /sbin/chkconfig --list | grep ':on' To turn off a service: > /sbin/chkconfig <service> off With Redhat 6.2, you'll also have to comment out the services you don't want run in /etc/inetd.conf and then restart inetd.
> rpm --erase lam |
Back to TOC
| 9. Upgrading RedHat Software | |||
RedHat, like all software, has bugs. You should
upgrade RedHat with all the available fixes to have the most stable
and secure system possible (with the obvious caution that some of
the updates might have undesired behaviours). Unless you want your
new mega-buck cluster to get rooted by script kiddies, do this!
Substitute rh62, rh70, rh71, rh72, or rh73 for rhxx depending on what version of RedHat you are using. > mkdir -p /install/post/updates/rhxx > cd /install/post/updates/rhxx
Download all the rpms from updates/x.x/en/os/i386/ and updates/x.x/en/os/noarch/, to the directory you created above, where x.x is the RedHat release you are using. You will also want to download any glibc packages that are available in updates/x.x/en/os/i686/, so you have an optimized C library. If you're using the RedHat kernel, grab it from updates/x.x/en/os/i686/ as well.
|
Back to TOC
| 10. Installing Custom Kernel | ||||||
These instructions mention the use of pre-built xCAT custom
kernels. In the past, you probably wanted to use these. Today, you
should probably use a RedHat kernel update RPM or roll your own.
Upgrade to lastest redhat kernel RPM or roll your own from kernel.org. RedHat 7.1 You may want to use the kernel or roll you know, but...then again, you may want to: > cd / ; tar xzvf kernel-2.4.5-2hpc.tgz RedHat 6.2, 7.0? > cd / ; tar xzvf kernel-2.2.19-4hpc.tgz
# BEGIN example of /etc/lilo.conf for Redhat 6.2 after editing
boot=/dev/sda
map=/boot/map
install=/boot/boot.b
prompt
timeout=50
linear
default=2.2.19-4hpc

image=/boot/vmlinuz-2.2.19-4hpc
        label=2.2.19-4hpc
        read-only
        root=/dev/sda9

image=/boot/vmlinuz-2.2.14-5.0smp
        label=linux
        initrd=/boot/initrd-2.2.14-5.0smp.img
        read-only
        root=/dev/sda9

image=/boot/vmlinuz-2.2.14-5.0
        label=linux-up
        initrd=/boot/initrd-2.2.14-5.0.img
        read-only
        root=/dev/sda9
# END expample of /etc/lilo.conf
Do the right thing if you're using grub instead of lilo.
|
Back to TOC
| 11. Installing xCAT | |||||
Installing xCAT on the management node is very straightforward:
The latest verion of xCAT is 1.1RC9.9.5.
> tar xzvf /where/you/put/it/xcat-dist-1.1RC9.9.5.tgz
> cd /opt/xcat/sbin > ./setupxcat Note: setupxcat must actually be run after xCAT .tab files are setup later on.
MANPATH /opt/xcat/man Test out the man pages: > man site.tab |
Back to TOC
| 12. Configuring xCAT | |||||||||||||
This section describes some of the xCAT configuration necessary
for the 32 node example cluster. If your cluster differs from this
example, you'll have to make changes. xCAT configuration files are
located in /opt/xcat/etc. You must setup these
configuration files before proceeding.
> cp /opt/xcat/samples/etc/* /opt/xcat/etc
/opt/xcat/etc/site.tab
# site.tab control most of xCAT's global settings.
# man site.tab for information on what each field means.
# this example uses 'c' as a subdomain private to the cluster and
# 10.0.0.1 as the corp DNS server (forwarder).
rsh			/usr/bin/ssh
rcp			/usr/bin/scp
gkhfile			/opt/xcat/etc/gkh
tftpdir			/tftpboot
tftpxcatroot		xcat
domain			c.mydomain.com
dnssearch		c.mydomain.com,mydomain.com
nameservers		192.16.100.1
forwarders		10.0.0.1
nets			172.16.0.0:255.255.0.0,172.17.0.0:255.255.0.0,172.18.0.0:255.255.0.0
dnsdir			/var/named
dnsallowq		172.16.0.0:255.255.0.0,172.17.0.0:255.255.0.0,172.18.0.0:255.255.0.0
domainaliasip		172.16.100.1
mxhosts			c.mydomain.com,man-c.c.mydomain.com
mailhosts		man-c
master			man-c
homefs			man-c:/home
localfs			man-c:/usr/local
pbshome			/var/spool/pbs
pbsprefix		/usr/local/pbs
pbsserver		man-c
scheduler		maui
xcatprefix		/opt/xcat
keyboard		us
timezone		US/Central
offutc			-6
mapperhost		NA
serialmac		0
serialbps		9600
snmpc			public
snmpd			172.17.100.1
poweralerts		Y
timeservers		man-c
logdays			7
installdir		/install
clustername		Clever-cluster-name
dhcpver			2
dhcpconf		/etc/dhcpd.conf
dynamicr		eth0,ia32,172.30.0.1,255.255.0.0,172.30.1.1,172.30.254.254
usernodes		man-c
usermaster		man-c
nisdomain		NA
nismaster		NA
nisslaves		NA
homelinks		NA
chagemin		0
chagemax		60
chagewarn		10
chageinactive		0
mpcliroot		/opt/xcat/lib/mpcli
/opt/xcat/etc/nodelist.tab
# nodelist.tab contains a list of nodes and defines groups that
# can be used in commands.  man nodelist.tab for more information.
node01	all,rack1,compute,myri,mpn1
node02	all,rack1,compute,myri,mpn1
node03	all,rack1,compute,myri,mpn1
node04	all,rack1,compute,myri,mpn1
node05	all,rack1,compute,myri,mpn1
node06	all,rack1,compute,myri,mpn1
node07	all,rack1,compute,myri,mpn1
node08	all,rack1,compute,myri,mpn1
node09	all,rack1,compute,myri,mpn2
node10	all,rack1,compute,myri,mpn2
node11	all,rack1,compute,myri,mpn2
node12	all,rack1,compute,myri,mpn2
node13	all,rack1,compute,myri,mpn2
node14	all,rack1,compute,myri,mpn2
node15	all,rack1,compute,myri,mpn2
node16	all,rack1,compute,myri,mpn2
node17	all,rack1,compute,myri,mpn3
node18	all,rack1,compute,myri,mpn3
node19	all,rack1,compute,myri,mpn3
node20	all,rack1,compute,myri,mpn3
node21	all,rack1,compute,myri,mpn3
node22	all,rack1,compute,myri,mpn3
node23	all,rack1,compute,myri,mpn3
node24	all,rack1,compute,myri,mpn3
node25	all,rack1,compute,myri,mpn4
node26	all,rack1,compute,myri,mpn4
node27	all,rack1,compute,myri,mpn4
node28	all,rack1,compute,myri,mpn4
node29	all,rack1,compute,myri,mpn4
node30	all,rack1,compute,myri,mpn4
node31	all,rack1,compute,myri,mpn4
node32	all,rack1,compute,myri,mpn4
rsa01	nan,mpa
rsa02	nan,mpa
rsa03	nan,mpa
rsa04	nan,mpa
ts01	nan,ts
ts02	nan,ts
myri01  nan
/opt/xcat/etc/mpa.tab
#service processor adapter management
#
#type      = asma,rsa
#name      = internal name (must be unique)
#            internal name should = node name
#            if rsa/asma is primary management
#            processor
#number    = internal number (must be unique and > 10000)
#command   = telnet,mpcli
#reset     = http(ASMA only),mpcli,NA
#dhcp      = Y/N(RSA only)
#gateway   = default gateway or NA (for DHCP assigned)
#
rsa01	rsa,rsa01,10001,mpcli,mpcli,NA,N,NA
rsa02	rsa,rsa02,10002,mpcli,mpcli,NA,N,NA
rsa03	rsa,rsa03,10003,mpcli,mpcli,NA,N,NA
rsa04	rsa,rsa04,10004,mpcli,mpcli,NA,N,NA
/opt/xcat/etc/mp.tab
# mp.tab defines how the Service processor network is setup.
# node07 is accessed via the name 'node07' on the RSA 'rsa01', etc.
# man asma.tab for more information until the man page to mp.tab is ready
node01	rsa01,node01
node02	rsa01,node02
node03	rsa01,node03
node04	rsa01,node04
node05	rsa01,node05
node06	rsa01,node06
node07	rsa01,node07
node08	rsa01,node08
node09	rsa02,node09
node10	rsa02,node10
node11	rsa02,node11
node12	rsa02,node12
node13	rsa02,node13
node14	rsa02,node14
node15	rsa02,node15
node16	rsa02,node16
node17	rsa03,node17
node18	rsa03,node18
node19	rsa03,node19
node20	rsa03,node20
node21	rsa03,node21
node22	rsa03,node22
node23	rsa03,node23
node24	rsa03,node24
node25	rsa04,node25
node26	rsa04,node26
node27	rsa04,node27
node28	rsa04,node28
node29	rsa04,node29
node30	rsa04,node30
node31	rsa04,node31
node32	rsa04,node32
/opt/xcat/etc/apc.tab
# apc.tab  defines  the  relationship  between nodes and APC
# MasterSwitches and their assigned outlets.  In our example,
# the power for asma1 is plugged into the 1st outlet the the
# APC MasterSwitch, etc.
rsa01	apc1,1
rsa02	apc1,2
rsa03	apc1,3
rsa04	apc1,4
ts01	apc1,5
ts02	apc1,6
myri01	apc1,7
/opt/xcat/etc/conserver.cf # conserver.cf defines how serial consoles are accessed. Our example # uses the ELS terminal servers and node01 is connected to port 1 # on ts01, node02 is connected to port 2 on ts01, node17 is connected to # port 1 on ts02, etc. # man conserver.cf for more information # # The character '&' in logfile names are substituted with the console # name. Any logfile name that doesn't begin with a '/' has LOGDIR # prepended to it. So, most consoles will just have a '&' as the logfile # name which causes /var/consoles/
/opt/xcat/etc/conserver.tab
# conserver.tab  defines  the relationship between nodes and
# conserver servers.  Our example uses only one conserver on
# the localhost.  man conserver.tab for more information.
node01	localhost,node01
node02	localhost,node02
node03	localhost,node03
node04	localhost,node04
node05	localhost,node05
node06	localhost,node06
node07	localhost,node07
node08	localhost,node08
node09	localhost,node09
node10	localhost,node10
node11	localhost,node11
node12	localhost,node12
node13	localhost,node13
node14	localhost,node14
node15	localhost,node15
node16	localhost,node16
node17	localhost,node17
node18	localhost,node18
node19	localhost,node19
node20	localhost,node20
node21	localhost,node21
node22	localhost,node22
node23	localhost,node23
node24	localhost,node24
node25	localhost,node25
node26	localhost,node26
node27	localhost,node27
node28	localhost,node28
node29	localhost,node29
node30	localhost,node30
node31	localhost,node31
node32	localhost,node32
/opt/xcat/etc/nodehm.tab
#
#node hardware management
#
#power     = mp,baytech,emp,apc,apcp,NA
#reset     = mp,apc,apcp,NA
#cad       = mp,NA
#vitals    = mp,NA
#inv       = mp,NA
#cons      = conserver,tty,rtel,NA
#bioscons  = rcons,mp,NA
#eventlogs = mp,NA
#getmacs   = rcons,cisco3500
#netboot   = pxe,eb,ks62,elilo,file:,NA
#eth0      = eepro100,pcnet32,e100,bcm5700
#gcons     = vnc,NA
#serialbios   = Y,N,NA
#
#node	power,reset,cad,vitals,inv,cons,bioscons,eventlogs,getmacs,netboot,eth0,gcons,serialbios
#
node01  mp,mp,mp,mp,mp,conserver,rcons,mp,rcons,pxe,eepro100,vnc,N
node02  mp,mp,mp,mp,mp,conserver,rcons,mp,rcons,pxe,eepro100,vnc,N
node03  mp,mp,mp,mp,mp,conserver,rcons,mp,rcons,pxe,eepro100,vnc,N
node04  mp,mp,mp,mp,mp,conserver,rcons,mp,rcons,pxe,eepro100,vnc,N
node05  mp,mp,mp,mp,mp,conserver,rcons,mp,rcons,pxe,eepro100,vnc,N
node06  mp,mp,mp,mp,mp,conserver,rcons,mp,rcons,pxe,eepro100,vnc,N
node07  mp,mp,mp,mp,mp,conserver,rcons,mp,rcons,pxe,eepro100,vnc,N
node08  mp,mp,mp,mp,mp,conserver,rcons,mp,rcons,pxe,eepro100,vnc,N
node09  mp,mp,mp,mp,mp,conserver,rcons,mp,rcons,pxe,eepro100,vnc,N
node10  mp,mp,mp,mp,mp,conserver,rcons,mp,rcons,pxe,eepro100,vnc,N
node11  mp,mp,mp,mp,mp,conserver,rcons,mp,rcons,pxe,eepro100,vnc,N
node12  mp,mp,mp,mp,mp,conserver,rcons,mp,rcons,pxe,eepro100,vnc,N
node13  mp,mp,mp,mp,mp,conserver,rcons,mp,rcons,pxe,eepro100,vnc,N
node14  mp,mp,mp,mp,mp,conserver,rcons,mp,rcons,pxe,eepro100,vnc,N
node15  mp,mp,mp,mp,mp,conserver,rcons,mp,rcons,pxe,eepro100,vnc,N
node16  mp,mp,mp,mp,mp,conserver,rcons,mp,rcons,pxe,eepro100,vnc,N
node17  mp,mp,mp,mp,mp,conserver,rcons,mp,rcons,pxe,eepro100,vnc,N
node18  mp,mp,mp,mp,mp,conserver,rcons,mp,rcons,pxe,eepro100,vnc,N
node19  mp,mp,mp,mp,mp,conserver,rcons,mp,rcons,pxe,eepro100,vnc,N
node20  mp,mp,mp,mp,mp,conserver,rcons,mp,rcons,pxe,eepro100,vnc,N
node21  mp,mp,mp,mp,mp,conserver,rcons,mp,rcons,pxe,eepro100,vnc,N
node22  mp,mp,mp,mp,mp,conserver,rcons,mp,rcons,pxe,eepro100,vnc,N
node23  mp,mp,mp,mp,mp,conserver,rcons,mp,rcons,pxe,eepro100,vnc,N
node24  mp,mp,mp,mp,mp,conserver,rcons,mp,rcons,pxe,eepro100,vnc,N
node25  mp,mp,mp,mp,mp,conserver,rcons,mp,rcons,pxe,eepro100,vnc,N
node26  mp,mp,mp,mp,mp,conserver,rcons,mp,rcons,pxe,eepro100,vnc,N
node27  mp,mp,mp,mp,mp,conserver,rcons,mp,rcons,pxe,eepro100,vnc,N
node28  mp,mp,mp,mp,mp,conserver,rcons,mp,rcons,pxe,eepro100,vnc,N
node29  mp,mp,mp,mp,mp,conserver,rcons,mp,rcons,pxe,eepro100,vnc,N
node30  mp,mp,mp,mp,mp,conserver,rcons,mp,rcons,pxe,eepro100,vnc,N
node31  mp,mp,mp,mp,mp,conserver,rcons,mp,rcons,pxe,eepro100,vnc,N
node32  mp,mp,mp,mp,mp,conserver,rcons,mp,rcons,pxe,eepro100,vnc,N
rsa01   apc,apc,NA,NA,NA,NA,NA,NA,NA,NA,NA,NA,N
rsa02   apc,apc,NA,NA,NA,NA,NA,NA,NA,NA,NA,NA,N
rsa03   apc,apc,NA,NA,NA,NA,NA,NA,NA,NA,NA,NA,N
rsa04   apc,apc,NA,NA,NA,NA,NA,NA,NA,NA,NA,NA,N
ts01    apc,apc,NA,NA,NA,NA,NA,NA,NA,NA,NA,NA,N
ts02    apc,apc,NA,NA,NA,NA,NA,NA,NA,NA,NA,NA,N
myri01  apc,apc,NA,NA,NA,NA,NA,NA,NA,NA,NA,NA,N
/opt/xcat/etc/noderes.tab
#
#TFTP         = Where is my TFTP server?
#               Used by makedhcp to setup /etc/dhcpd.conf
#               Used by mkks to setup update flag location
#NFS_INSTALL  = Where do I get my files?
#INSTALL_DIR  = From what directory?
#SERIAL       = Serial console port (0, 1, or NA)
#USENIS       = Use NIS to authencate (Y or N)
#INSTALL_ROLL = Am I also an installation server? (Y or N)
#ACCT         = Turn on BSD accounting
#GM           = Load GM module (Y or N)
#PBS          = Enable PBS (Y or N)
#ACCESS       = access.conf support
#GPFS         = Install GPFS
#INSTALL NIC  = eth0, eth1, ... or NA
#
#node/group	TFTP,NFS_INSTALL,INSTALL_DIR,SERIAL,USENIS,INSTALL_ROLL,ACCT,GM,PBS,ACCESS,GPFS,INSTALL_NIC
#
compute man-c,man-c,/install,0,N,N,N,Y,Y,Y,N,eth0
nan     man-c,NA,NA,NA,NA,NA,NA,NA,NA,NA,NA,NA
/opt/xcat/etc/nodetype.tab
# nodetype.tab maps nodes to types of installs.
# Our example uses only one type, but you might have a few
# different types.. a subset of nodes with GigE, storage nodes,
# etc.  man nodetype.tab for more information.
########### !!!!!!!!!!!! this file can not contain comments !!!!
########### !!!!!!!!!!!! this file can not contain comments !!!!
########### !!!!!!!!!!!! this file can not contain comments !!!!
node01	compute73
node02	compute73
node03	compute73
node04	compute73
node05	compute73
node06	compute73
node07	compute73
node08	compute73
node09	compute73
node10	compute73
node11	compute73
node12	compute73
node13	compute73
node14	compute73
node15	compute73
node16	compute73
node17	compute73
node18	compute73
node19	compute73
node20	compute73
node21	compute73
node22	compute73
node23	compute73
node24	compute73
node25	compute73
node26	compute73
node27	compute73
node28	compute73
node29	compute73
node30	compute73
node31	compute73
node32	compute73
/opt/xcat/etc/passwd.tab # passwd.tab defines some passwords that will be used in the cluster # man passwd.tab for more information. cisco cisco rootpw netfinity asmauser USERID asmapass PASSW0RD |
Back to TOC
| 13. Configuring the Ethernet Switch | ||||||
This section describes configuring the ethernet switch. Some of
it is a bit rough. I'd appreciate some more accurate content.
|
Back to TOC
| 14. Configuring Networking on the Management Node | ||||||
This section describes network setup on the management node:
The following is an sample of the /etc/hosts for the example cluster: # Localhost 127.0.0.1 localhost.localdomain localhost # ########## Management Node ################### # # cluster interface (eth0) GigE 172.16.100.1 man-c.c.mydomain.com man-c # # management interface (eth1) 172.17.100.1 man-m.c.mydomain.com man-m # # external interface (eth2) 10.0.0.1 man.c.mydomain.com man # ########## Management Equipment ############## # # RSA adapters. You might have ASMA cards instead 172.17.1.1 rsa01.c.mydomain.com rsa01 172.17.1.2 rsa02.c.mydomain.com rsa02 172.17.1.3 rsa03.c.mydomain.com rsa03 172.17.1.4 rsa04.c.mydomain.com rsa04 # # Terminal Servers 172.17.2.1 ts01.c.mydomain.com ts01 172.17.2.2 ts02.c.mydomain.com ts02 # # APC Master Switch 172.17.3.1 apc1.c.mydomain.com apc01 # # Myrinet Switch's ethernet management port 172.17.4.1 myri01.c.mydomain.com myri01 # # Ethernet Switch 172.17.5.1 ethernet01c.c.mydomain.com ethernet01c 172.16.5.1 ethernet01.c.mydomain.com ethernet01 # ########## Compute Nodes ##################### # # 172.16.1.1 node01.c.mydomain.com node01 172.18.1.1 node01-myri0.c.mydomain.com node01-myri0 172.16.1.2 node02.c.mydomain.com node02 172.18.1.2 node02-myri0.c.mydomain.com node02-myri0 172.16.1.3 node03.c.mydomain.com node03 172.18.1.3 node03-myri0.c.mydomain.com node03-myri0 172.16.1.4 node04.c.mydomain.com node04 172.18.1.4 node04-myri0.c.mydomain.com node04-myri0 172.16.1.5 node05.c.mydomain.com node05 172.18.1.5 node05-myri0.c.mydomain.com node05-myri0 172.16.1.6 node06.c.mydomain.com node06 172.18.1.6 node06-myri0.c.mydomain.com node06-myri0 172.16.1.7 node07.c.mydomain.com node07 172.18.1.7 node07-myri0.c.mydomain.com node07-myri0 172.16.1.8 node08.c.mydomain.com node08 172.18.1.8 node08-myri0.c.mydomain.com node08-myri0 172.16.1.9 node09.c.mydomain.com node09 172.18.1.9 node09-myri0.c.mydomain.com node09-myri0 172.16.1.10 node10.c.mydomain.com node10 172.18.1.10 node10-myri0.c.mydomain.com node10-myri0 172.16.1.11 node11.c.mydomain.com node11 172.18.1.11 node11-myri0.c.mydomain.com node11-myri0 172.16.1.12 node12.c.mydomain.com node12 172.18.1.12 node12-myri0.c.mydomain.com node12-myri0 172.16.1.13 node13.c.mydomain.com node13 172.18.1.13 node13-myri0.c.mydomain.com node13-myri0 172.16.1.14 node14.c.mydomain.com node14 172.18.1.14 node14-myri0.c.mydomain.com node14-myri0 172.16.1.15 node15.c.mydomain.com node15 172.18.1.15 node15-myri0.c.mydomain.com node15-myri0 172.16.1.16 node16.c.mydomain.com node16 172.18.1.16 node16-myri0.c.mydomain.com node16-myri0 172.16.1.17 node17.c.mydomain.com node17 172.18.1.17 node17-myri0.c.mydomain.com node17-myri0 172.16.1.18 node18.c.mydomain.com node18 172.18.1.18 node18-myri0.c.mydomain.com node18-myri0 172.16.1.19 node19.c.mydomain.com node19 172.18.1.19 node19-myri0.c.mydomain.com node19-myri0 172.16.1.20 node20.c.mydomain.com node20 172.18.1.20 node20-myri0.c.mydomain.com node20-myri0 172.16.1.21 node21.c.mydomain.com node21 172.18.1.21 node21-myri0.c.mydomain.com node21-myri0 172.16.1.22 node22.c.mydomain.com node22 172.18.1.22 node22-myri0.c.mydomain.com node22-myri0 172.16.1.23 node23.c.mydomain.com node23 172.18.1.23 node23-myri0.c.mydomain.com node23-myri0 172.16.1.24 node24.c.mydomain.com node24 172.18.1.24 node24-myri0.c.mydomain.com node24-myri0 172.16.1.25 node25.c.mydomain.com node25 172.18.1.25 node25-myri0.c.mydomain.com node25-myri0 172.16.1.26 node26.c.mydomain.com node26 172.18.1.26 node26-myri0.c.mydomain.com node26-myri0 172.16.1.27 node27.c.mydomain.com node27 172.18.1.27 node27-myri0.c.mydomain.com node27-myri0 172.16.1.28 node28.c.mydomain.com node28 172.18.1.28 node28-myri0.c.mydomain.com node28-myri0 172.16.1.29 node29.c.mydomain.com node29 172.18.1.29 node29-myri0.c.mydomain.com node29-myri0 172.16.1.30 node30.c.mydomain.com node30 172.18.1.30 node30-myri0.c.mydomain.com node30-myri0 172.16.1.31 node31.c.mydomain.com node31 172.18.1.31 node31-myri0.c.mydomain.com node31-myri0 172.16.1.32 node32.c.mydomain.com node32 172.18.1.32 node32-myri0.c.mydomain.com node32-myri0
/etc/modules.conf
alias eth0 e1000
alias eth1 pcnet32
alias eth2 e100
/etc/sysconfig/network NETWORKING=yes HOSTNAME="man-c" GATEWAY="10.0.0.254" GATEWAYDEV="eth2" FORWARD_IPV4="no" /etc/sysconfig/network-scripts/ifcfg-eth0 DEVICE="eth0" BOOTPROTO="none" IPADDR="172.16.100.1" NETMASK="255.255.0.0" ONBOOT="yes" /etc/sysconfig/network-scripts/ifcfg-eth1 DEVICE="eth1" BOOTPROTO="none" IPADDR="172.17.100.1" NETMASK="255.255.0.0" ONBOOT="yes" /etc/sysconfig/network-scripts/ifcfg-eth2 DEVICE="eth2" BOOTPROTO="none" IPADDR="10.0.0.1" NETMASK="255.0.0.0" ONBOOT="yes"
> makedns master If the management node's IP address is listed first in site.tab's nameservers field (as it is in our example), this will generate zone files from the data in /etc/hosts and start a DNS server as a master. If the management node's IP address is listed in the nameservers field, but not first, then it will become a slave DNS server and will do a zone xfer from the master (the first IP address listed). If the management node's IP address is not in site.tab then it's possible for the first IP address not to be in the cluster. Some installations user their own DNS external to the cluster and setup all the cluster names there. In this case, you just put the IP address of this external DNS server as the #1 address in the nameservers field, and the IP of the management node as #2, then #2 is a slave and will do a zone xfer, then you'll need to update either the .kstmp or /install/post/sync (this is what I do) to copy a resolv.conf to the clients that specify only to use the slave(2) for DNS.
> host node01 > host 172.16.1.1 Do not continue until forward and reverse name resolution are working.
Note: Tie this into the configuring the ethernet switch section and remove redundant information. There are other subsections in this section that need similar treatment.
|
Back to TOC
| 15. Doing the Compute Node Preinstall (stage1) | |||||
| 'stage1' is an automated procedure for updating and configuring
system BIOSes. This section describes an easy way to upgrade the
x330 compute nodes' firmware and set their BIOS settings. It is x330
specific. You're on your own with non-x330s... just make certain
that you enable PXE boot by setting the boot order to be CDROM,
Floppy, Network, HD and that you disable virus detection or any
other interactive BIOS features. Note: Tonko's new unified stage1 stuff will replace this section very soon.
For 1 GHz machines (model 8654): Create a CD from the ISO image located at: /opt/xcat/stage/stage1/x330.iso Create a floppy from the floppy image located at: /opt/xcat/stage/stage1/x330.dd This can be done under Linux buy placing a blank DOS formatted floppy into the floppy drive and: > dd if=x330.dd of=/dev/fd0 bs=1024 conv=sync; sync For machines > 1 GHz (model 8674): Create a floppy from the floppy image located at: /opt/xcat/stage/stage1/x330-6874-1.02.dd This can be done under Linux buy placing a blank DOS formatted floppy into the floppy drive and: > dd if=x330-6874-1.02.dd of=/dev/fd0 bs=1024 conv=sync; sync You don't need a CD.
After waiting a minute or so, restore AC Power to compute nodes and apply power to ASMA cards.
Reconnect the SPN serial network after all the machines have been flashed. You shouldn't make any compute node BIOS modifications after this procedure.
You will want to create customer a customer x330.dd floppy image. Here's how:
|
Back to TOC
| 16. Configuring the Terminal Servers | |||||||||||||
This section describes setting up ELS and ESP terminal
servers and conserver. Your cluster will probably have either ELSes
or ESPs so you can skip the instructions for the terminal server
type that is not a part of your cluster. Terminal servers enable
out-of-band administration and access to the compute nodes... e.g.
watching a compute node's console remotely before the compute node
can be assigned an IP address or after the network config gets
messed up, etc.
> /sbin/service/conserver stop
This has already been covered in the configuring xCAT section, but this explains it... Each node gets a line like: nodeXXX:!tsx:yyyy:&: where x = ELS Unit number and yyyy = ELS port + 3000 e.g. node1:!ts1:3001:&: means access node1 via telnet to ts1 on port 3001. 'node1' should be connected to ts1's first serial port.
Reset the ELS to factory defaults. You usually have to push the reset botton. If the button is green, just push it. If the botton is white, you need to hold it down until the link light stops blinking. All the new units have green buttons. Connect the DB-9 adaptor Equinox part #210062 to the management nodes's first serial port (COM1) and connect a serial cable from the ELS to the DB-9 adapter. You can test that the serial connection is good with: > cu -l /dev/ttyS0 -s 9600 Hit Return to connect and you should see: Username> Unplug the serial cable to have cu hangup and then reconnect it for the next step: > setupelsip <ELS_HOSTNAME> Test for success: > ping <ELS_HOSTNAME>
> setupels <ELS_HOSTNAME> to finish the setup for each ELS in your cluster. This sets up the terminal server's serial settings. After the serial settings are set, you can not use setupelsip again, because the serial ports have been set for reverse use. A reset of the unit will have to be performed again, if you need to change the IP address.
Each node gets a line like: nodeXXX:/dev/ttyQxxyy:9600p:&: where xx = ESP Unit number and yy = ESP port (in hex) e.g. ttyQ01e0
> cp /opt/xcat/rc.d/espx /etc/rc.d/init.d/ > chkconfig espx on
> service espx stop > rmmod espx > service espx start
|
Back to TOC
| 17. Completing Management Node Setup | |||||||||||||||||||||
Here, we setup the final services necessary for a functioning
management node.
> cd /opt/xcat/rc.d > cp atftpd portmap snmptrapd syslog /etc/rc.d/init.d/ There are other init files in /opt/xcat/rc.d that you may wish to use, depending on your installation. Note: Why portmap?
> cd /opt/xcat/post > find . | cpio -dump /install/post
> cp /opt/xcat/samples/syslog.conf /etc > touch /var/log/pipemessages > service syslog restart On RH7.x based installs, you might want to edit /etc/sysconfig/syslog, changing SYSLOGD_OPTIONS and add the -r switch instead of copying the modified rc.d/syslogd. See the note here (but ignore the watchlogd stuff).
> chkconfig snmptrapd on > service snmptrapd start
> chkconfig watchlogd on > service watchlogd start You also must setup an alias in /etc/aliases called alerts. This alias is a comma delimited list of admins that should receive these hardware alerts as email. The above is no longer supported. See this note.
> cd /opt/xcat/post/rpm62 > rpm -ivh --force --nodeps openssh*.rpm
/install node*(ro,no_root_squash) /tftpboot node*(ro,no_root_squash) /usr/local node*(ro,no_root_squash) /opt/xcat node*(ro,no_root_squash) /home node*(rw,no_root_squash) Turn on NFS: > chkconfig nfs on > service nfs start > exportfs -ar # (to source) > exportfs # (to verify)
> chkconfig ntpd on > service ntpd start RedHat 6.2: > chkconfig xntpd on > service xntpd start Note: setupxcat does this now, but you might want to configure the ntpd conf file to point to an external time server.
> rpm -ivh /opt/xcat/post/rpmxx/atftp-0.6-1.i386.rpm > chkconfig atftpd on > service atftpd start Test that tftp is working by monitoring /var/log/messages and: > tftp localhost > get bogus_file > quit You should see tftp try to service the 'get' request in the log output. Note: The tftpd that comes by default with RedHat 7.2,7.3 might work better than atftpd. atftpd scales well, but it has been know to die mysteriously.
If you have APC master switches, put their MAC addresses into this file.
> vi /etc/dhcpd.conf
# BEGIN portion of /etc/rc.d/init.d/dhcpd daemon /usr/sbin/dhcpd eth1 eth2 # END portion of /etc/rc.d/init.d/dhcpd On RedHat 7.2, you edit /etc/sysconfig/dhcpd instead of modifying /etc/rc.d/init.d/dhcpd, with something like: DHCPDARGS="eth1 eth2"
Edit the KERNELVER variable where appropriate in /opt/xcat/ksxx/*.kstmp.
> gensshkeys root Note: This is a good candidate for setupxcat. Also, I've found that I need to modify gensshkeys so that it places "Host myri* node*
|
Back to TOC
| 18. Collecting MAC Addresses (stage2) | ||||||||||
In this section, we collect the MAC addresses of the compute
nodes and create entries in dhcpd.conf for them.
> ./mkstage
> tail -f /var/log/messages You should always be watching messages. It's a very good way to get information about what's happening with your cluster. Watching it is a great habit to get into.
When the machine's boot, they should PXE boot syslinux, get a dynamic IP address, and then load a linux kernel and a special RAMdisk that contains a script that prints the machine's MAC address to the console.
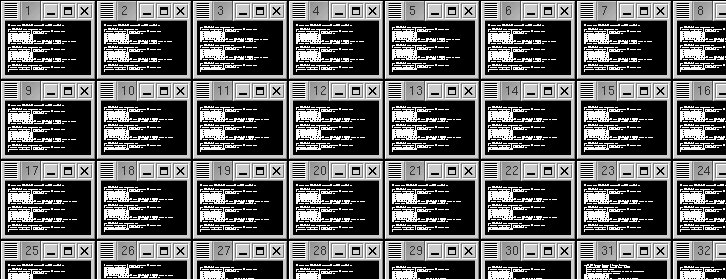 A closeup: 
To do this, move the mouse over the text portion of the xterm in question, hold down the control key, and press the right mouse button. You'll see a menu like the following: 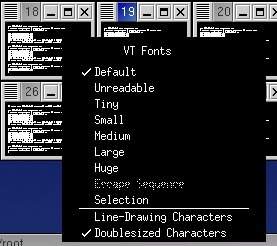 Move the mouse down to select a larger font and then release the mouse button as shown: 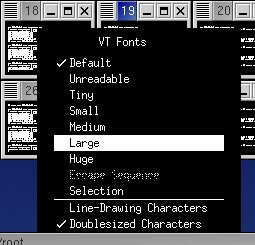 Using this xterm feature, you can switch to a large font for detailed viewing and back to the 'unreadable' font to view all the consoles at once.
> getmacs compute
> getmacs compute
At this point, a dhcpd will be running. So you might want to again make certain that it is only listening on the interfaces that you want it to be.
Configure cisco3500.tab with an example of the following: node01 ethernet01,1 node02 ethernet01,2 node03 ethernet01,3 node04 ethernet01,4 ... Make nodehm.tab have entries like: nodexx mp,mp,mp,mp,mp,conserver,mp,mp,rcons,cisco3500,eepro100,vnc Make sure the switch has a hostname and DNS resolves. Verify that the nodes pluged into the switch ports match what you put into cisco3500.tab IE node1 port1 node2 port2 Make sure you can ping the switch, telnet to it and login. Make sure the password you set on the switch is the same in passwd.tab. Put the nodes in stage2. Power them on and getmacs as usual. What the getmacs command does is issue the show mac-address-table on the switch and grab the macs from it. |
Back to TOC
| 19. Configuring MPN/ASMA/RSA (stage3) | |||||||||||
Stage3 is a mostly automated procedure for configuring the
Management Processor Network (MPN) (formally known as Service
Processor Network) on IBM xSeries machines. This section describes
how to perform stage3 with ASMA or RSA adapters. If your cluster
doesn't have a Management Processor Network, you can skip this
section.
This does a parallel ping to all the nodes that are defined as being a memeber of the group 'asma' in nodelist.tab. If you're using RSA adapters, you may have a group 'rsa' instead of 'asma'. If any of the adapters show up as 'noping', you'll have to investigate why they are not connecting to the network before you continue.
This command sets up things like alerts, SNMP information, etc on each management adapter in the 'asma' group over IP. Again you might want to user a 'rsa' group if you have RSA adapters.
At this point all of the Management Processors should be correctly programmed. Next, we'll configure the Service Processor devices that are in each compute node...
> nodeset compute stage3
> tail -f /var/log/messages (you should always be watching messages)
After a successful stage3 procedure, your wcons windows should look something like: 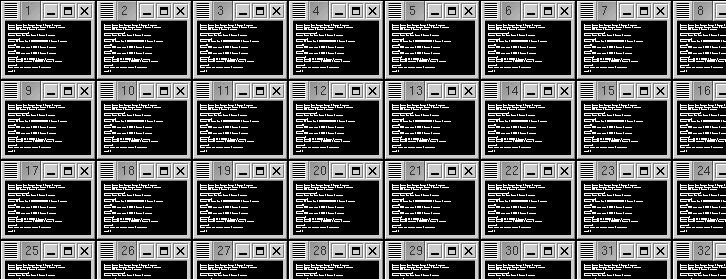
Closeup: 
Example: > rvitals compute ambtemp
|
Back to TOC
| 20. Configuring APC Master Switches | |||||||
| An APC
Master Switch or similar remotely controlled Power Distribution
Unit can be very valuable in easing administration headaches that
are sometimes involved in maintaining clusters. In our example cluster, the APC Master Switch is connected to the management ethernet VLAN and powers the MPAs, terminal servers, and Myrinet switch. After proper configuration, this allows the administrator to reset these devices by cycling their power from their desktop or another remote location with xCAT's rpower command-line utility. This is useful for debugging, troubleshooting, or just dealing with a flaky component and becomes a real requirement when you only have remote access to a cluster... Who wants get out of your chair and walk into the server room anyways? APC's Installation guide can be found here.
|
Back to TOC
| 21. Installing Compute Nodes | |||||||||
LaLaLa.
Generate real kickstart scripts from the templates: > cd /opt/xcat/ksxx; ./mkks
> nodeset compute install
> tail -f /var/log/messages (you should always be watching messages)
> rpower compute boot
> winstall -t 8 compute This command accomplishes the above three commands in one step. When going through the install procedure, you'll probably want to install onto only a single machine until you're fairly certain that the install is working well.. then do installs on the whole 'compute' group. When installing with wcons, you should see something like the following: 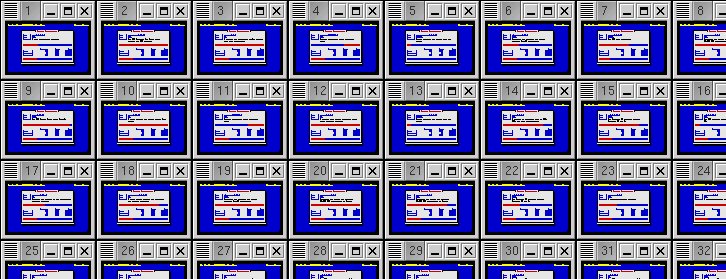
Closeup: 
The output here will be a good way to see if SSH/gkh is setup correctly on all of the compute nodes (a requirement for most cluster tasks). If a node doesn't appear here correctly, you must go back and troubleshoot the individual node, make certain the install happens correctly, rerun makesshgkh, and finally test again with psh. You really must get psh working correctly before continuing. |
Back to TOC
| 22. Installing/Configuring Myrinet Software | ||||||||||||
The following section only applies to clusters that use Myrinet. It gives an example of
creating a GM rpm on RedHat 6.2 and installing this driver on the
compute nodes. With RedHat 7.1, the procedure will be slightly
different (the kernel version will be different). You may wish to do
the rpm building part of this section before you do the previous
step to avoid having to install the compute nodes multiple times.
Verify forward and reverse name resolution for these host names. Add all the hosts that have Myrinet cards to the 'myri' group in nodelist.tab.
The result should be a GM rpm in /usr/src/redhat/RPMS/i686 If you're using a RedHat kernel, you'll need to prep the kernel tree before you do the above step (clearly some of the details change if you're using a different kernel than I am below).. > cd /usr/src > ln -s 2.4.9-31 linux > cd /usr/src/linux > make mrproper > cp kernel-2.4.9-i686-smp.config ../.config > make menuconfig (change PII to PIII), save and exit > make deps > make modules (for 30 secs, then ctrl c), this usually setups a few links that are required.
> ./mkks
No output means success.
If the management node doesn't have a Myrinet card, you'll want to keep GM from loading at boot... > chkconfig --level 0123456 gm off |
Back to TOC
| 23. Installing Portland Group Compilers |
| This section is out of date. You will benefit from reading the
FAQ at: http://www.pgroup.com/faq.htm
Connect to the Portland Group's ftp server: ftp://ftp.pgroup.com/.
|
Back to TOC
| 24. Installing MPICH MPI Libraries |
MPI is a standard library used for message passing in parallel
applications. This section documents how to install the MPICH MPI
implementations that are used over ethernet and Myrinet.
|
Back to TOC
| 25. Installing LAM MPI Libraries |
LAM is a lesser used alternative to MPICH for message passing
with MPI. It is reportedly faster then MPICH over TCP/IP. The stable
version of LAM runs only over TCP/IP (no GM). This section documents
how to install LAM. Skip this section if you don't need to use LAM.
|
Back to TOC
| 26. Installing PBS Resource Manager | |||
PBS is a free tool that enables you to run batch jobs on a
cluster. Here's how it can be setup quickly to work with our
example:
Download the source from: http://www.openpbs.org/UserArea/Download/OpenPBS_2_3_12.tar.gz
> cp /where/ever/you/put/it/OpenPBS_2_3_16.tar.gz /tmp > /opt/xcat/build/pbs/pbsmaker OpenPBS_2_3_16.tar.gz scp You should now have stuff in /usr/local/pbs. Configuration and environmnet setup is completed in the genpbs step later on. |
Back to TOC
| 27. Installing Maui Scheduler | |||
Maui is an OpenSource scheduler that offers advanced scheduling
algorithms and integrates with PBS. Here's how it can be setup
quickly to work with our example:
It would be a good idea to read the docs.
> tar -xzvf maui-3.0.7p7.tar.gz > cd maui-3.0.7 > ./configure Maui Installation Directory? /usr/local/maui Maui Home Directory? /usr/local/maui Compiler? gcc Checksum SEED? 123 Correct? Y Do you want to use PBS? [Y|N] default (Y) PBS Target Directory: /usr/local/pbs > make > make install You should now have stuff in /usr/local/maui. Environment setup and configuration will happen is the genpbs section later on. > mkdir /var/log/maui |
Back to TOC
| 28. Deploying PBS on the Cluster | ||
If you're running PBS and Maui and you've installed them in the
above two steps, you'll want to follow the instructions in this
section to finish their setup and deploy them on the compute nodes.
(Where 'compute' is a nodelist.tab group that includes all your compute nodes)
An example of part of the expected output on a 32 node, dual CPU cluster follows: 0 Active Jobs 0 of 64 Processors Active (0.00%)
0 of 32 Nodes Active (0.00%)
If you don't see this kind of output, something is wrong with
your PBS setup. You should fix it before you continue.
|
Back to TOC
| 29. Adding Users and Setting Up User Environment | ||
There are a number of thing necessary to setup for each user,
before they can run jobs within the framework of the example
architecture. Some of the things covered in this section have been
covered previously. Use your judgment on if and where to apply the
following:
export MPICH="/usr/local/mpich/1.2.1..7/gm-1.5_Linux-2.2.19-4hpc/smp/gnu/ssh" export MPICH_PATH="${MPICH}/bin" export MPICH_LIB="${MPICH}/lib" export PATH="${MPICH_PATH}:${PATH}" export LD_LIBRARY_PATH="${MPICH_LIB}:${LD_LIBRARY_PATH}"
This command automates a lot of user setup. More on what it does after I get a chance to play with it a little. I wish there was a man page, but the source tells all. |
Back to TOC
| 30. Verifying Cluster Operation With Pseudo Jobs and PBS | ||||
At this point, the cluster is almost ready to go. This section
outlines a number of tests that will show that the infrastructure is
in place for jobs to be successfully run on the cluster:
> su - ibm (or what ever user your testing) > touch ~/test_of_read_write_home_dir (or what ever user your testing) If you can't su to this user, something is wrong. If you're using NIS, there's an NIS problem... 'ypwhich; ypcat passwd' to test. If you're not using NIS, you probably haven't added this user to the compute node's /etc/passwd, etc. If you cant touch a file in the user's home directory, you don't have a writable home directory... fix it. Make the above test work before continuing.
> ssh node01 If you're using access control, like we are in the example xCAT configuration (ACCESS = Y in noderes.tab for node01), you should get a permission denied error. This is the correct behavior.... user's can only ssh to a resource after PBS has allocated the node to the user. If you're not using access control, you should be able to ssh to node01 as a regular user.
Request a job: > su - ibm (or whatever user you're testing (on the management node)) > qsub -l nodes=1,walltime=10:00 -I This submits an interactive job to PBS, asking for 1 node for 10 minutes. After a bit, PBS should put you on one of the compute nodes. This should look something like: qsub: waiting for job 1.man-c to start qsub: job 1.man-c ready ---------------------------------------- Begin PBS Prologue Tue Oct 30 16:44:56 MST 2001 Job ID: 1.man-c Username: ibm Group: ibm Nodes: node32 End PBS Prologue Tue Oct 30 16:44:56 MST 2001 ---------------------------------------- [ibm@node32 ibm]$If it doesn't, your PBS setup is broken. Fix it before continuing. If you get a permission denied type of error, your user's ssh key-pair or ssh configuration isn't setup correctly. Fix it before continuing. When you can successfully get to the compute node via PBS as a regular user, try to ssh back to the head node. You should be able to without supplying a password. If you can't, something's broken. Fix it before continuing.
Request a job: > su - ibm (or whatever user you're testing (on the management node)) > qsub -l nodes=2,walltime=10:00 -I This submits an interactive job to PBS, asking for 2 nodes for 10 minutes. After a bit, PBS should put you on one of the compute nodes and give you a list of the compute nodes that you have access to. This should look something like: qsub: waiting for job 2.man-c to start qsub: job 2.man-c ready ---------------------------------------- Begin PBS Prologue Tue Oct 30 16:47:36 MST 2001 Job ID: 2.man-c Username: ibm Group: ibm Nodes: node31 node32 End PBS Prologue Tue Oct 30 16:47:36 MST 2001 ---------------------------------------- [ibm@node32 ibm]$Test using ssh between the compute nodes you have access to and the headnode. You should be able to ssh to and from all these nodes without supplying a password. If you can't, something's broken. Fix it before continuing. |
Back to TOC
| 31. Running a Simple MPI Job Interactively via PBS |
This section outlines how to build and run a simple MPI job:
|
Back to TOC
| 32. Running a Simple MPI Job in Batch Mode via PBS |
Now we're ready to run cpi in batch mode via PBS:
|
Back to TOC
| 33. Performing Advanced Tasks |
| This section is a place holder to remind me to provide information about GPFS, storage nodes, and other more advanced stuff. |
Back to TOC
| 34. Contributing to xCAT |
| Join the xCAT-dev mailing list and post your suggestions, bug-fixes, code, etc. |
Back to TOC
| 35. Changelog | |||||||||||||||||||||||||||||||||||||||||||||||||||||||||||||||||||||||||||||||||||||||||||||||||||||||||||||||
|
Back to TOC
| 36. TODO |
|
Back to TOC
| 37. Thanks |
Thanks go out to the following people. They helped this document
become what it is today.
|
Back to TOC